Via Instructables.com:
Allow me to preface…
Being a long-time Superman fan, I was happy to find out that a great-nephew (4 years old) was also a fan. With that, I decided to make him a a superman emblem to hang on his wall. With that done, all other great neices and nephews then wanted their own plaque as well (in various forms). So, making the list brought about a number 26 different plaques to make. So far, I have made 10 and try to make a new one once a week.
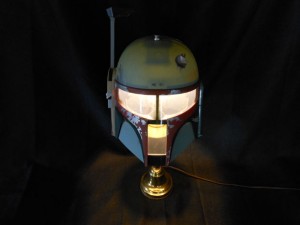
This instructable will show how to make a Star Wars Boba Fett helmet wall plaque.
Since I am making a lot of these in various forms from Boba Fett to Happy face flowers, I kept some ground rules in mind.
Keep price at a minimum and spend no more than $10 per plaque using current materials and paint, then buying extras needed.
Keep it simple enough to complete in a weeks time (about 4-5 hours actual work time)
Use plywood as a base material where possible.
Step 1: Get your concept ready
I ask each neice or nephew who their favorite hero, character, thing is and then research that. Boba Fett was easy to find. I just searched google images and found all the material I needed for the concept. That concept being a face on view of Boba Fett’s helmet.
As this nephew was a bit older, I wanted to spend some more time on this and try adding the battle scars. www.thedentedhelmet.com is a site dedicated to the building of Bobba Fett props and was indespensable in heping me find paint templates, close shots, etc.
OK… I got the concept, now time to draw it up! I took a good front view of the helmet and added it to photoshop. I then start to crop areas of color to determine how the plywood will be cut and stacked to make the view I want.
After that, it was easy to see how the layers would be painted and stacked. I then finished the concept and plan drawings with the battle scars to see the complete view of the drawn project.
Click below to see the full article.